DCO design
How to build a digitally controlled oscillator?
The Digitally Controlled Oscillator (DCO) was developed to address the temperature dependency issues of Voltage Controlled Oscillators (VCO). The core oscillator of a DCO is still analog but its frequency is controlled by a microcontroller rather than analog components. This makes DCOs way more accurate than VCOs and completely temperature independent.
Some argue DCOs sound too robotic compared to the imprecise VCOs but even if that's true, building a multi-voice paraphonic or polyphonic synth is exponentially less complex, less error-prone and less expensive using DCOs. The price of a Prophet 6 is quite reasonable at the end.
References
The Roland Juno 6/60 and 106 is one of the most famous synths using DCOs. Its simple design, cost and accuracy is perfect for a polyphonic synth. Add the amazing chorus effect and you got an instant classic.
My microcontroller of choise these days is the Raspberry Pi Pico. Thankfully there's an open-source DCO implementation and schematic available by Polykit in his Pico-DCO repository. This is the basis of my design too, however I ended up changing the circuit design and the code in order to fit the paraphonic use case better.
DCO circuit
The Polykit DCO design
Below is the original Polykit DCO design. It generates an upward/rising raw sawtooth waveform on the output of U2A. This is AC coupled by C4 and amplified by (U2C) to about 10Vpp on the final sawtooth output.
The raw sawtooth signal is used to generate the squarewave (pulse) output by a very simple comparator circuit (U2B), which is then divided down by R14 & R15 to have about 10Vpp on the square output as well. The inputs on the + terminal of U2B sets the pulse width of the squarewave: PWM_IN is supposed to be a modulation source (e.g. an LFO) to automate the pulse width, and PWM_POT is a potmeter for manually setting the baseline pulse width.

All the above sounds good in theory but after some testing I found two major problems with this design:
- Because the raw sawtooth output (on pin 1 of U2A) oscillates between 0 and 3.3V, it has to be AC coupled (that is why there's C4, a 10uF capacitor). The problem is that any AC coupling requires a some time to "settle": especially if the signal changes from pure DC (0Hz) to any non AC coupled periodic signal (non-zero Hz). It's a sudden transient at the beginning of each note which results in an audible pop on the output.
- Due to the manufacturing differences of analog components I had varying DC offset on the sawtooth output. Since the squarewave oscillator's pulse width depends on the voltage of the sawtooth output, I just could not set similar pulse widths on all DCOs using a single set of pulse width input (PWM_IN and PWM_POT).
Remixed DCO circuit
Below is my version of a DCO circuit. The core principle is exactly the same as Polykit's design but it solves the above problems.
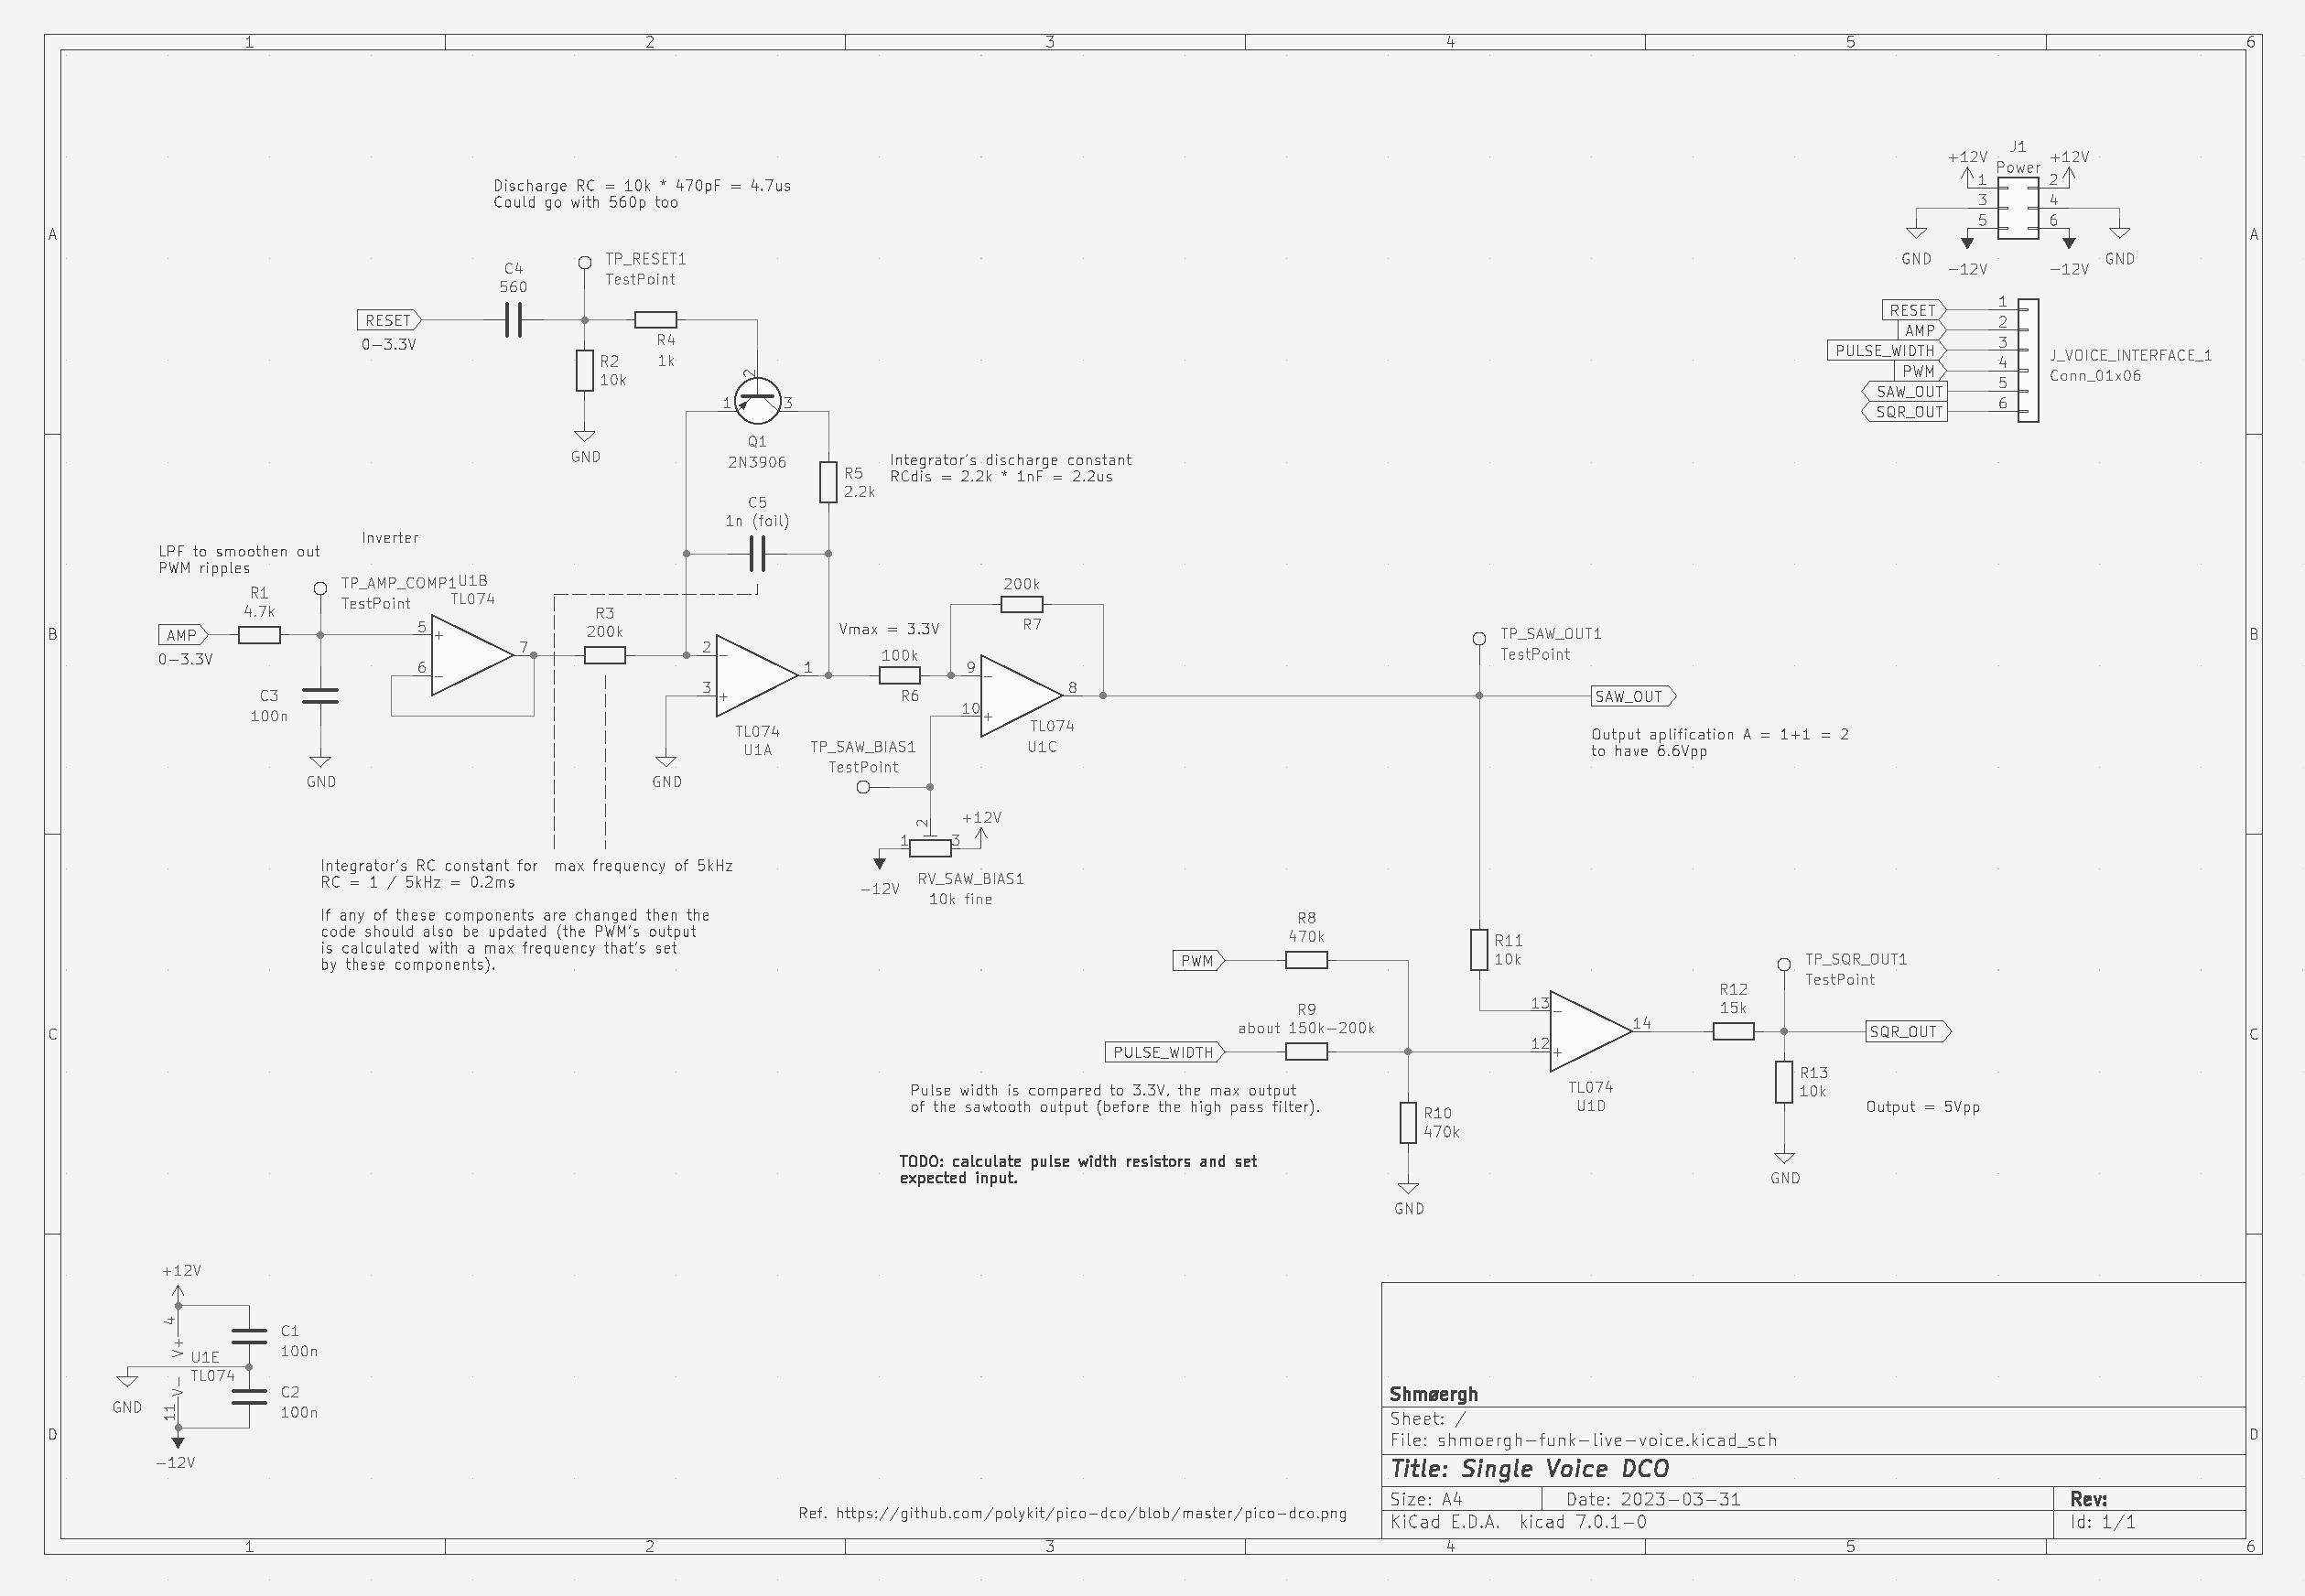
To eliminate the output pops I needed to make the raw sawtooth oscillate around 0V as much as possible without using AC coupling, ie. I had to offset the raw sawtooth signal by half its amplitude. There are two ways to do this, both involves an inverting op-amp circuit (U1C): either by mixing the raw sawtooth with some negative DC voltage on the op-amp's - terminal or by offsetting the baseline voltage of the mixer with a DC voltage on the + terminal. I chose the latter and to be able to set it precisely, I used a trimmer on the + input of U1C.
Since we're using an inverting circuit to offset the raw sawtooth signal, the final output will be inverted, ie. the final sawtooth will ramp down. But a proper sawtooth signal ramps up. To solve this issue we need a raw signal that ramps down. In order to do this, first I changed the NPN to a PNP transistor (Q1) and used a simple, non-inverting buffer on the amplitude compensation input, which BTW let me get rid of two resistors too.
These changes implicitly solve the 2nd problem too – the variation of the squarewave pulse width – because the sawtooth output of all voices (which we use to generate the squarewave) will oscillate similarly around 0V.
Here's how it sounds:
DCO code
The DCO code takes quite a lot directly from the Polykit DCO but I rewrote everything to object oriented C++ because I just find it easier to handle, more scalable and more robust. It's rather a personal preference.
I won't go into the details of how the code works, if you're interested please read the code itself.
 peterzimon
Paraphony implementation
There's one part though that is interesting to discuss, which is the implementation of paraphony. There are multiple ways to implement paraphony and I decided to start with the simplest and see how far I can get with it. Let's quickly recap what that is.
The minimal version of paraphony is if each voice is gated (turned on/off) according to some logic by setting the frequency and amplitude compensation via the microcontroller. This setup does not require a VCA and/or an ADSR per voice, instead all the voices are mixed and sent to a single VCA which is controlled by a single ADSR.
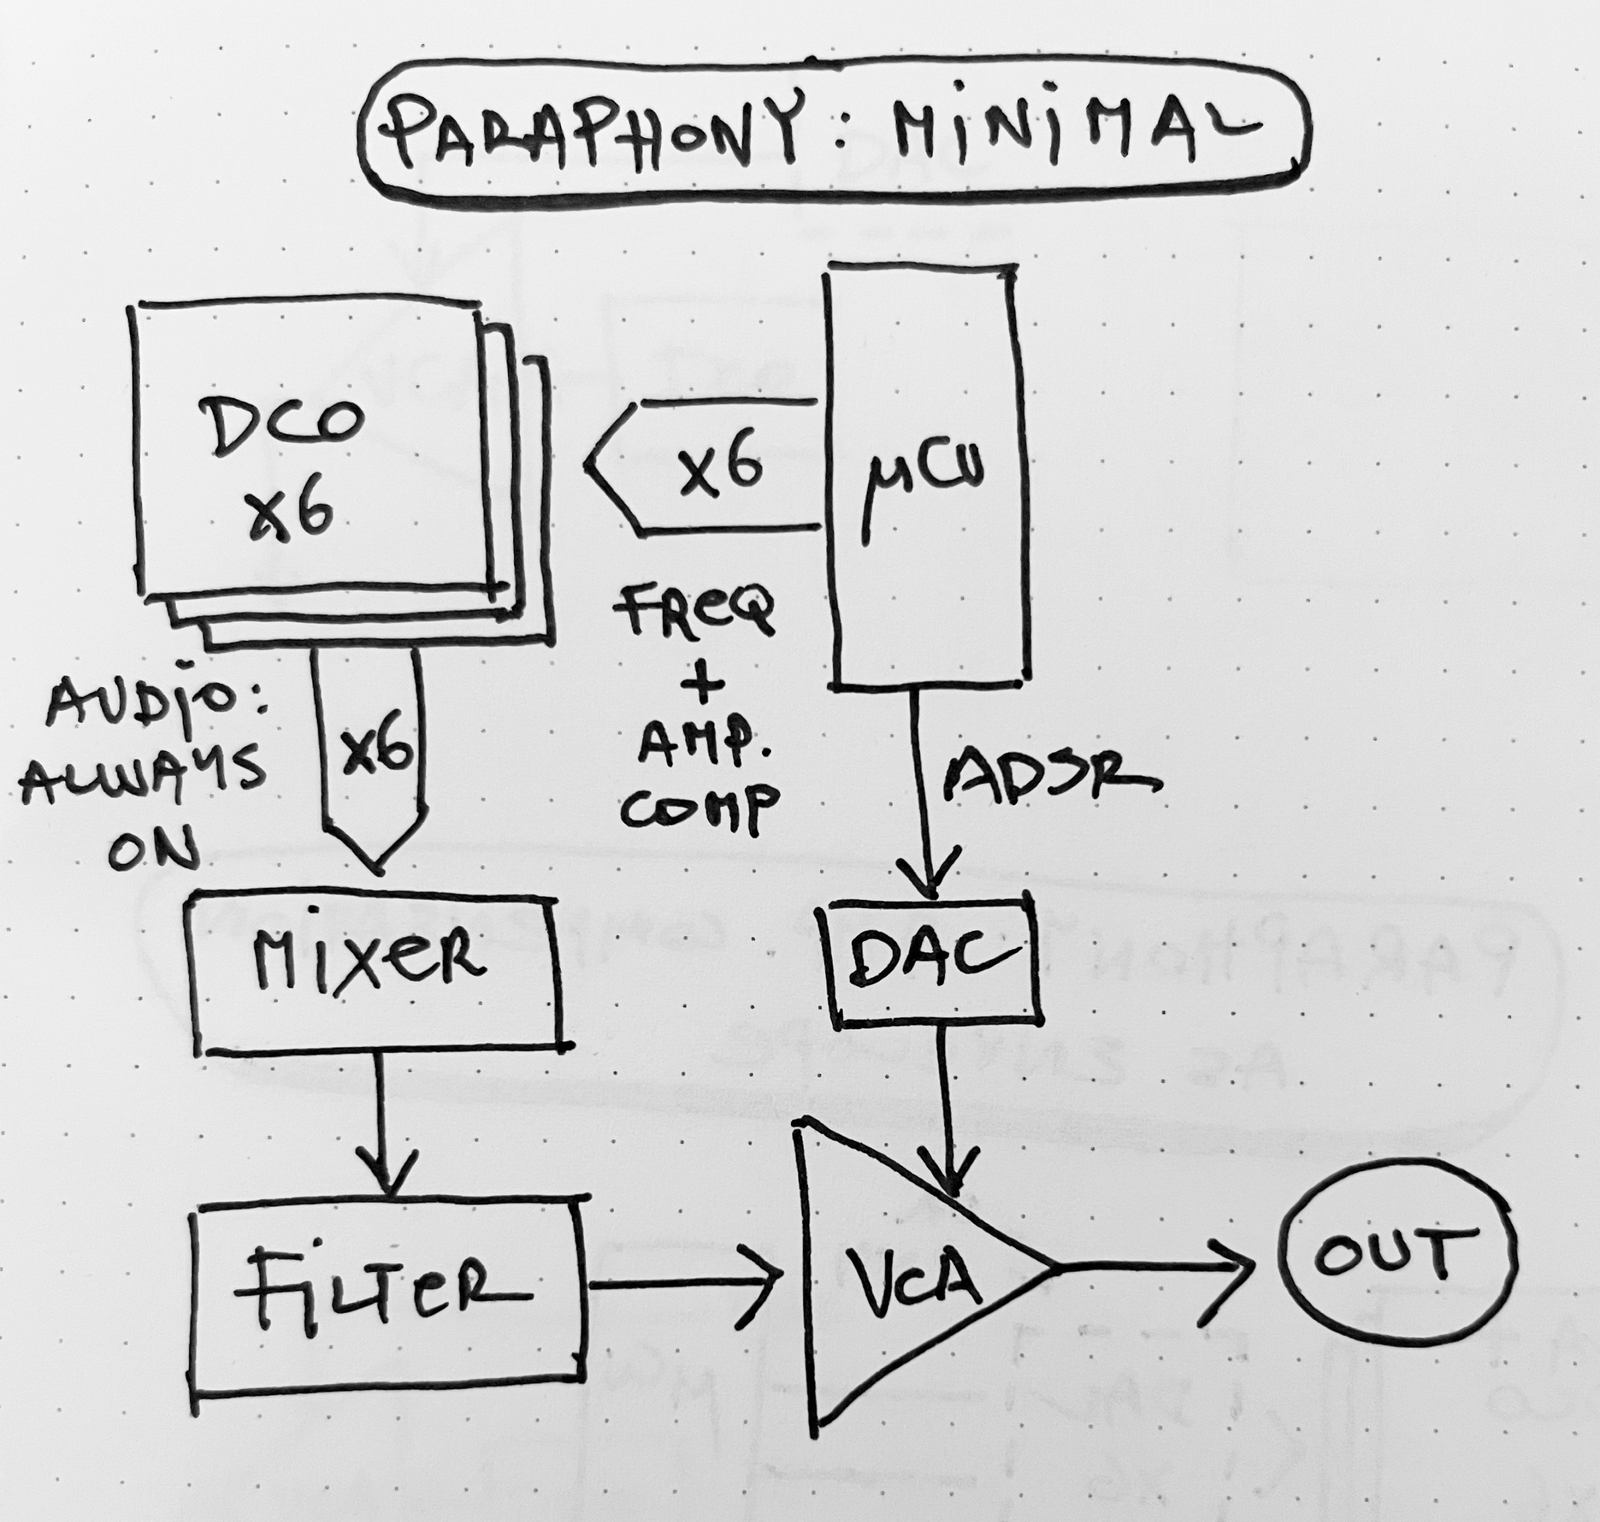
Voice stacking or not
There are 6 voices in this synth but obviously we can play less than 6 notes on the keybaord. So what should we do with the voices that are not playing? There are various strategies for that:
- We can stack all "free" voices. This means that all the voices are playing all the time regardless of how many notes are actually held on the keyboard. In this case the notes would be distributed equally between the free voices.
- We can stack some of the free voices. Same thing as the previous one just not all voices.
- Or we can simply forget about stacking and turn a voice on for each note played on the keyboard.
I ended up with option #3. I tried stacking but it resulted in weird artifacts, small phase differences between the same notes and the final sound just wasn't as good as I was expecting.
Gate
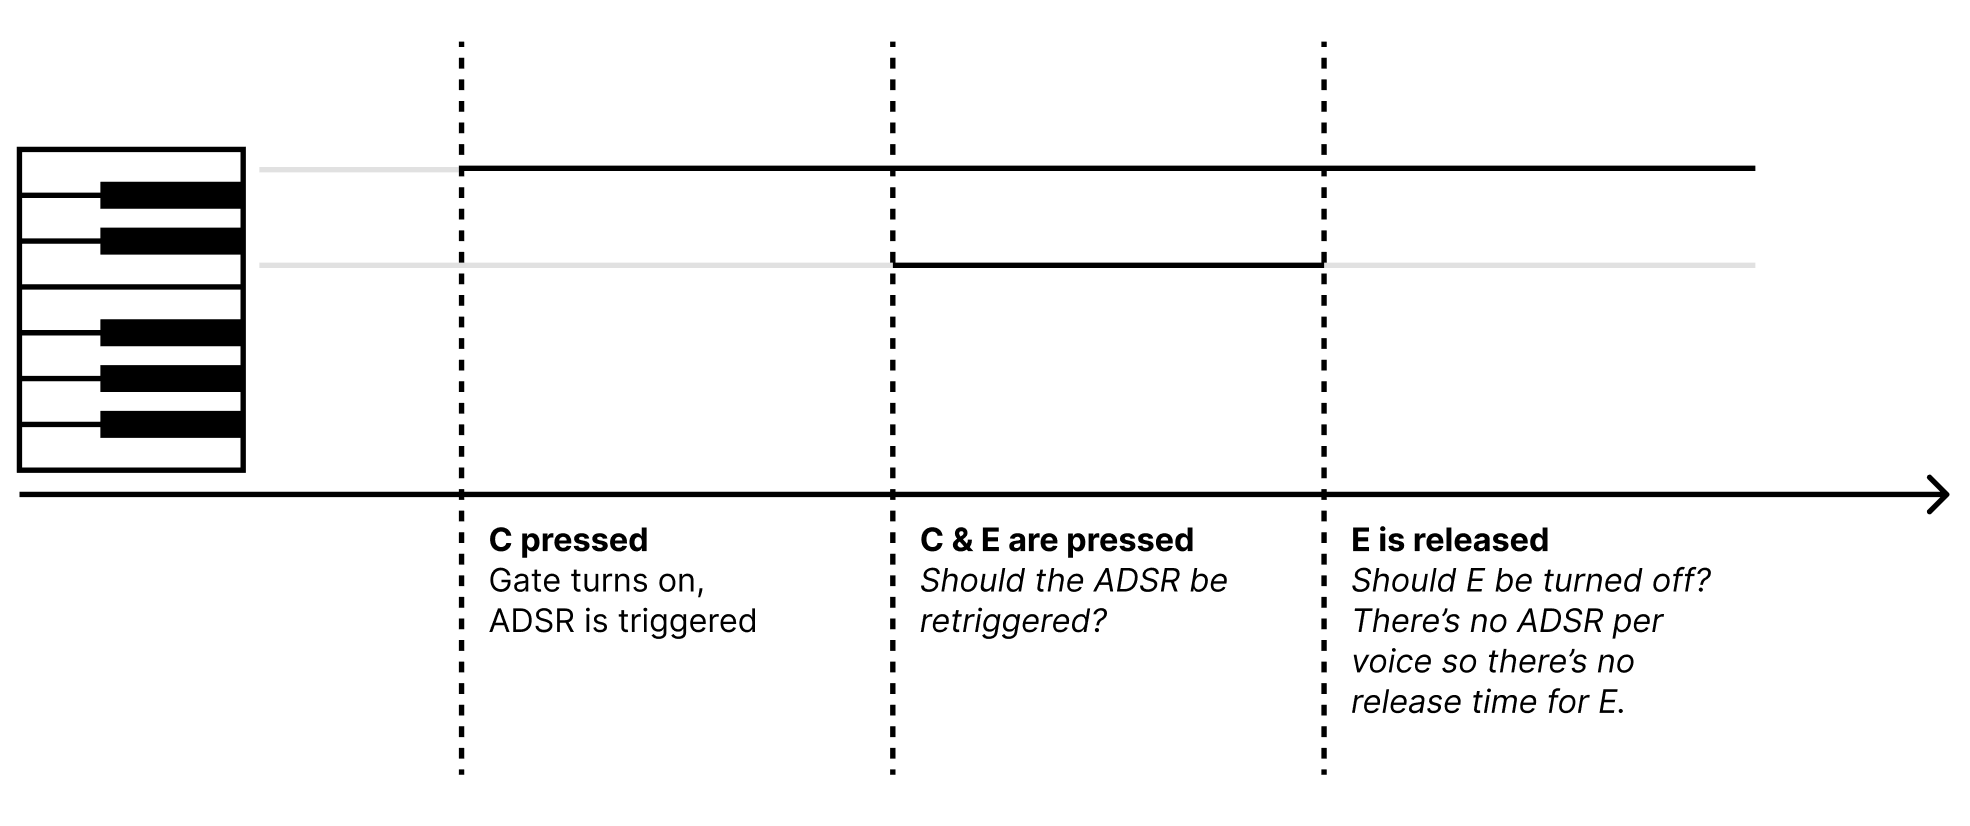
There's a very interesting challenge with this minimal version of paraphony: how should we use the single ADSR envelope with multiple voices? Take this example:
- I press C as the first note. Expectation: gate turns
onand a single note is played. - I press an E note while keeping the C pressed. Should we retrigger the ADSR?
- Let's release the E note. Now what should happen? If this was a piano, or a polyphonic synth then there would be a separate release phase of each note, so the E would fade out according to the release value while the C would keep playing. But this is a paraphonic synth with a single ADSR.
Behringer also ran into this issue with the Poly D. Watch the "Auto damp" part of this video starting from 4:50:
Calling it "Poly" D is at minimum very misleading.
So we have two questions and there is no definite right or wrong answer to any of them. Everything depends on the use case.
Should we retrigger on each note?
Retriggering can be interesting when playing solos, arpeggios but not that good when playing full chords. The Moog Matriarch has a dedicated switch for this.
Should we turn off a released voice even if it shuts down immediately
Again, depending on the use case, there are two options:
Option #1: the E note it stays ON until we release all the keys. While it sounds like a bad idea, it's actually great for playing chords when the whole chord should be faded out and not only the last note held. On the other hand, for faster solos with legators it can result in unwanted notes — check the Behringer video above.
Option #2: the E note immediately turns off when the key is released. This eliminates the unwanted notes in solos but sounds weird when playing chords.
So again, the solution is to provide a Solo/Chord switch, which is exactly what Behringer did with the Poly D, they just call it "Auto damp" (which I think is a less musical term).
And that's it for now. Next up is the envelope implementation using a Raspberry Pi Pico.